I designed park benches for the tennis courts in our town. 10 men and boys from our church built them. One of the boys and I built the prototype. It all worked. We built one and had 2 others ready for assembly including staining. One of the men had teak 4X4's, so we used those for the legs. I am sure they will last a long time and are very sturdy. The high school tennis coaches are going to place them around the court and apply a couple more coats of stain. I hope our church gets some publicity for this in our local paper, we will see.
The Art of Woodworking
Designing and creating wood projects has been a passion of mine for the last 25 years. I am sharing that journey with you and letting others see my progress. I have made many pieces not pictured. If you want a piece made contact me and we may be able to work something out.
Tuesday, August 16, 2016
Sunday, June 19, 2016
Medal Hanger
After finishing the bed side stands, I finished a piece to hang running medals. The shelf is walnut and the medal hanging wood is wormed maple. The finish is shellac that is waxed clear.
Bed Stands
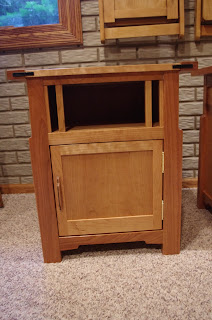
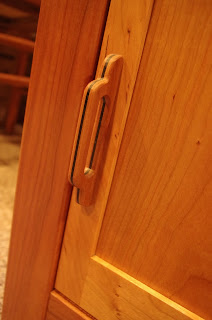
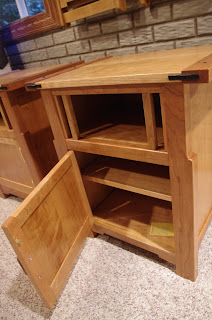
This project is finally done. I think I was very slow on this one. I built two bed side stands. The wood is cherry and the trim is ebony. The finish is a Bartley Varnish. There is no stain on the wood. The style is Greene and Greene. Here are the pictures. I hope to deliver them soon.... week after next.
 |
| Two Bedside Stands |
 |
| One Bedside Stand |
 |
| The door handles -- cherry and ebony middle |
 |
| Top -- no drawer |
 |
| The pillow ebony plug on the breadboard top |
 |
| Hinges |
 |
| Side Profile |
 |
| Open Door |
Thursday, April 14, 2016
On to finishing the panels
Monday, March 21, 2016
While things go slow
 |
| Jigs |
 |
| Parts |
Mentoring at church
I mentored a young man at church. We went to distribute water at Flint and made this cross. He designed it, sanded and finished it. I cut out the boards. It turned out fairly nice.
Friday, February 5, 2016
Bed stand plans
Bed Tables
Wednesday, November 18, 2015
For my Granddaughter

 I made a unit for my Granddaughter. It is cherry, The middle section can be pulled out to get into the closet behind the unit. My son's house in a cape code, so the rooms have an angled ceiling. The bottom of the unit is about 26 inches deep, so there are turntables to get the back. The other side has a desk unit, that changes in height, along with bungee cords to put her stuffed animals and such... so they do not fall our. The drawers in the middle unit are plywood, dovetails. All experts tell you that you cannot dovetail plywood... but i wanted to prove them wrong... and you can with enough backer boards to eliminate chips... not for the beginner woodworker. LED lights are recessed into the shelves and the bottom units. You can see the rafters in the top shelf. Also I turned cherry spindles and put a railing across the top. There are sliding doors on the right side of the unit.
 |
| Owl knobs |
 |
| Spindle rail |
 |
| Control panel for lights |
 |
| Lighted unit |
 |
| Sliding Doors |
 |
| Turntables |
 |
| Top Shelf with rafters, close fit! |
Tuesday, April 14, 2015
Recycle Containers

 I built my son a recycle container. There house is small, so to make the most of every room items need to be fitted into spaces. I made this two container recycle center to meet that need. It fit, not as well as I would like, but it is usable. We will see if he uses it. It is maple, painted. The panels are also ambrosia maple.
 Turning Bowls
 I was taught how to turn a bowl. The wood was green. I wanted to know if I enjoyed doing it, so I went to a two day class. I did manage to turn two bowls, one is cracked around the edges, due to the wood drying faster than I could turn the wood. We will see if turn another bowl, I may. To get the equipment and tools I need to spend another $300, and am not sure I will turn enough to warrant that money. I do have a lathe and did clean up these bowls on that lathe. I had trouble in the class because the distance of the tools on the bowl did not match my focal length. The teacher at one point, when I asked him again to get my tools started at the right angle, asked if I needed a time out... I told him no, I just need to get started with the tool and then I can feel my way through the rest... he took the time out and left the room. The other student came over and we got the tool at the right angle and all went well! Oh well, I have never been a good student.
Wednesday, January 28, 2015
Wacky Door Collection
  |
| Maple panels -- worm holes or ambrosia |
 |
| Walnut Burl |
Subscribe to:
Comments (Atom)


