Friday, December 27, 2013

Wardrobe


The sides
The Top
Waiting on the stain color, but still more to do.  I think I am going to move the back next.  It is a heavy piece.  While I am sure we could carry it upstairs from the workshop, I am glad we are going to pocket screw it together.  I will hide the pocket screws.  All is out of quartersawn white oak.  I am sure the people who will own this fine piece are keeping up with my blog to see the status of the work... they are not even subscribers.  Oh well, the work I do for all these people.

Monday, November 11, 2013

Wardrobe

I am building a wardrobe out of cross sawn oak.  I have cut out the legs and am gluing the top.
The legs
The plan for the finished piece

The top starting to be glued

Monday, August 5, 2013

Smores bar

Here is how the smores bar was set up at my nephew's wedding.  The establishment wanted to buy the boxes, but nobody had the authority to buy them.  I asked the person that approached me if the bill could be reduced, and they could not make that decision.  My nephew took them to his restaurants to use.  I guess if there is a sale to be made they will cost more due to shipping cost. 


Thursday, July 11, 2013

My Nephew's Boxes

My Nephew's Plans
Plans
My Nephew called me Monday and asked if I could build some boxes for his wedding.  The boxes are to be used at his wedding in August for smores.  So I asked him if he could tell me what he wanted.  He drew me a picture.  Even though he only drew one side, he wanted four, with no top... so we figured out the plan. . I gave him back some plans and this what the finished product looks like.

My Nephew's mother called and told my wife that they wanted them painted chocolate brown... so with three coats of shellac, I sprayed them with paint.  I will take a picture of them at the wedding and see how they are used.  I hope they work.
Painted boxes
The finished boxes before the paint

Thursday, June 20, 2013

Retrofit cabinets

Fat Guy by Cabinet
No fat guy
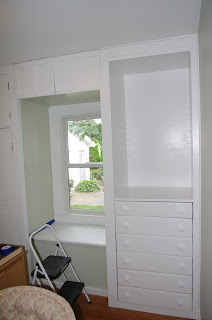
I just completed a built in for some friends that are a newlywed couple.  They are remodeling their first house.  I had to stay ahead of the painter, a good friend from church.  She told me that she would be ready for the room I was in in about a week.  So I have been cranking this week.  I built the top unit and side unit, and retrofit it in the wall unit.  I also filled in many of the cracks with molding that I made.  I used the drawer fronts on the old piece.  Inside those fronts are solid maple drawers, with 3/4" sides and 1/4" bottom set in a groove all around the drawers.  The case is made from 3/4" maple plywood.  The piece is finished with shellac and with a water based poly on both the inside of drawers, cabinet above the window seat and the shelves.  They may paint the outside white, unsure at this time.  Shellac will accept paint very well, not sure about the poly shelves and no need to paint the inside that is polyurethane.  I may post a picture after they are painted.  Most of the construction is with pocket screws, I broke from my traditional mortise and tenon, with dados.  Pocket screws will create just as sturdy of a piece and reduced the labor... by a little.  The drawers are about 22" long on slides, so they work fairly easy, need to pull on both knobs because of the size, can create a size bind... but it is not too bad.  After the couple realizes how easy these drawers are to slide they will want to install slides and new drawers in their whole house... but I am sure that is a ways off.  Have fun. 
As completed without the Fat Guy

Saturday, June 1, 2013

The Wilson Bell

The Wilson Bell
When Grandmother Wilson (Sandy's Grandmother) the family all split up the possessions.  So we got the farm bell.  We have been moving with that bell for at least 30 years.  So I finally decided to display it in the yard.  It was a feat to get it on the pole.  The pole is out of cypress, hollow with a square post at the bottom.

Saturday, April 6, 2013

Hall Table

Dovetail and Tiger Maple Detail
A piece I just finished.  It was to be the stand for a jewelry box I made years ago.  My wife has never liked the box, so we have placed it on the main floor for a while.  It is a Greene and Greene inspired piece.  It has a floating shelf in the bottom.  As with all my work, it is using Indiana woods.  Cherry is the main wood with walnut pieces for the handles and floating shelves.  The drawers are made from maple, tiger maple for the fronts and soft maple for the drawers.  It was finished using a dark water based tint to color the wood very slightly, which was the first coat.  Then all the pieces were rubbed with boiled linseed oil.  The next coat was blonde shellac for the bottom, with a dark wax as a final finish coat.  The top was coated with garnet shellac (dark), covered with a water based poly, I may wax it for a final coat -- I am not sure yet.  The poly will protect it better for water damage and make it harder to repair than the bottom.  Shellac can be re-melted using alcohol, so repair is easy.

The top is 7/8" thick and the legs are 1 1/2" thick.  You can see the tiger maple in some of the pictures.


Sunday, March 10, 2013

Greene and Greene inspired piece

Many years ago I made my wife a jewelry box, that she does not like!  She always wanted something to sit the box on that was simple, so I came up with this Greene and Greene inspired piece.  I am not finished yet, but thought I better post something for my three followers!


I am using some new techniques.  I am using water based, environmentally friendly dyes and finishes -- I have always used oil based products.  First I am mixing the dye with water and applying that on the wood.  This piece will have cherry, walnut and maple woods used in the piece.  The drawer will be curly maple, which you can see the quilt pattern in the picture.  The apron around the top is birds eye maple veneer because I could not find a good pieces of quilted maple locally, so I used a small piece I have been saving for a project. 

I am applying a shellac over the stain, which I am mixing myself with alcohol,  if I would use a drinking alcohol the surface could be used for food preparation, I am using a denatured alcohol.  Shellac is a resin secreted by the female lac bug from Thailand and India, when mixed with alcohol it dries fast and leaves the resin on the wood.  Woodworkers from the 19th centuries and earlier used it mainly for wood protection to be replaced by lacquers and polyurethanes.  It binds to itself very easily and is able to be repaired much easier than its more modern substitutes.  You have to mix it and it takes about a day to dissolve in alcohol, it dries very fast.  On this piece I am going to apply a water based poly over the shellac.  The next piece I am going to start with a base of dye then apply Tung oil or linseed oil and see how that turns out.  You would think I would experiment with pieces of wood.... but that would not be as much fun!  The piece has a floating shelf at the bottom, the picture has the maple a little yellow, it is more of light brown as you see in the picture of the curly maple. 

Saturday, February 16, 2013

And, more tools

In 1991, we lived in Dayton Ohio and I learned about a company in Dayton called Shopsmith.  Shopsmith manufactured an all purpose tool that had a drill press, lathe, sander, and table saw.  I went with my Dad and Charlie Felz and pick it up.  That tool allowed me to improve my skills and build a TV cabinet.   We also became the house to come to for the Boy Scout Projects.

Thursday, February 14, 2013

Todd and Nicole's Wedding -- Nightstands


I made a chest of drawers for Todd and Nicole's wedding and I do  not have a picture.  Here are a couple of bed stands I made them. 

Toys

I made Tyler and Cole toys for Christmas.  A skid loader, truck and bulldozer. 

In our Den

This was my first veneer project.  I went to class to learn to veneer, so I built this piece with bird's eye maple panels to show off my veneer skills. 

A Wall Unit


Friends of ours, Tom and Marcia, wanted a wall unit to go into a closet.  They had many requirements... and they wanted it in oak.

Lamp stands

Must get done before the wedding.  My neighbor and friend that I co-taught Sunday School, wanted a couple of pieces for a special area in their house. 

Toy Box


In 2009, I made Tyler a toy box.  Now this is kind of an unique toy box. 

Arbor


And, to get real brave I made an arbor for our yard.  It is still up and working.  This was about 2007.  A view in the winter and summer.

Chinese Checker sets


I took a crack at making Chinese Checker sets.  I started by making some for my family, then friends in Brazil.  I then made one and sold on E-bay right before Christmas... so I thought I had a gold mine.  I made a bunch of them and tried to sell them at a local store and on E-bay, the store went out of business and took my checker sets with them.  And, I could not get a bid on E-bay.  Oh well... another bad business venture.  I have a wonderful pattern if anyone wants to buy one... make me an offer and I may make one for you! 

Cherry Curio Cabinet

In 2004, my wife wanted a curio cabinet in a certain spot.  So I built and designed this to please her.  My shop is much cleaner now, I have learned that keeping to shop clean makes tools easier to find.

Many more projects


There were many projects I completed.  I built book cases, refinished chairs, built dining room furniture.... and many more project that I never took pictures.  That is why I started this blog, to get the discipline to record my work.